Sunday, July 31, 2016

man cave light change

The man cave is in an upstairs bedroom and its one of the only rooms that the AC just doesn't cool. I'm not sure what exactly is up with that but it was so hot in this room it wasn't enjoyable. We talked about adding a window AC but decided that was more expensive in the long run so we started looking at ceiling fans. At first I was really afraid to do it since neither of us is an electrician and currently there was just a light with one switch there.


 I had no idea what all we had to change or move to make it a ceiling fan/light combo. After some research [Youtube search] Zack felt confident that he could do it and after a little [a LOT] of convincing I was on board. We picked up this one from Walmart of all places.

 It took him maybe an hour and now we have a beautiful and functional way of cooling this room without much cost.


So much better and so worth the time/money. Sometimes its the simplest changes that reap the biggest reward!

xoxo,
Jackie

53 days till fall

I love fall. Like Looooovveee it. I might be a bit biased but Colorado is the most beautiful place ever in the fall and I love to decorate for it so even though technically fall is 53 days I consider September 1 to be the first day of fall so I really have 30 days until I get to decorate for my favorite season ever and I am so excited! If you remember last year I stepped out of my comfort zone and went with a lot of color for the season and to be quite honest I ended up hating it completely after a couple weeks.


I am just not a fan of color in my home, [or my clothes but that's another story in its self] so I decided that this year I'm going to keep it simple and true to my style by going with a very neutral farmhouse style. Here's what I'm thinking.

I already have pretty much everything I just need to make the plaid pillows and I actually found a really adorable plaid tablecloth at Ross for just $12.99. I can make 3 pillows out of it so that's a pretty awesome deal.

Also, I have to make the Welcome sign for the front porch but that'll be super easy as I already have some scrap wood to do it with and then Ill just pickup some white pumpkins and that's it. Should be simple so stay tuned!

xoxo,
Jackie

Sunday, July 24, 2016

Living room re-do

Finally we have fixed the couch situation and boy is it a nice change!


We didn't change much in here, there was no painting or anything at all. All we did was replace the couches, a couple throw pillows and the table and floor lamp. Here's some before and afters ...


All we need now is a rug and I cant decide which one I want! these are the options I'm contemplating....

The options are
1. white and grey moroccan trellis rug
2. black and white faux cowhide
3. beige/brown faux cowhide
4. something else

As soon as I decide I'll do a proper photoshoot and show you how great it actually looks!

xoxo,
Jackie

Man Cave Reveal

You guys! We finished the man cave! We literally finished 2 whole rooms within a month of each other. How exciting is that? I feel so accomplished! Now, in my last post I talked all about how I design a room from start to finish and I touched on mood boards. This is honestly how I start every single project so I wanted to take you back to our original plan for this room first before we make our way to the after photos.

Here is our first rough design of the room,


And if you remember I talked in this post about how we decided to change things up and re-use our existing furniture and this was the new plan we came up with....


and this is how the room looked when we started....


SOME progress....


Final reveal...


Sources:

Couches -American Furniture Warehouse 
Tv- Best Buy
TV stand- American Furniture Warehouse 
Bookcase - Ikea Vittsjo
Shadow boxes - Michaels
Side table -Hobby Lobby
Rug-American furniture Warehouse
Ottomans-Target


Since we are on a roll with finishing rooms I decided to start on the living room ASAP. We already purchased the sofa, we ended up going with this beauty.
Those rolled arms! I cant wait to get it all installed and since we don't actually need to do any painting or major work in here we just need to throw in the furniture and accessories so this will be a quick makeover with major results! 

xoxo,
Jackie


How I design a room from start to finish

I have a very methodical way of designing and creating a space, it helps me not over spend and keeps me organized so I know exactly what I need so I can get the room done faster. I wanted to share with you how I do this from start to finish, so here we go!

First, I create a mood board. Sometimes this is the longest process because I can spend hours searching for the right items to go together to get the space I envisioned in my head. Now, I don't spend a lot of time searching for items in stores nearby or anything like that, usually, I just Google what I'm looking for and when I find it, I copy and paste that into Paint shop. The idea here isn't to find the exact items I will actually buy, its to find items that I love so that I can see it all together.

Then I just start purchasing things off that "list"and crossing them off [its the best feeling to visually see your items being crossed off].  Sometimes I cannot find the exact item as it is sold out or out of my budget, so then I start looking for similar items. The point of the mood board is to see the styles together, but sometimes that's just unreachable so I look for the next best thing. For instance, this is the mood board I had for my master


and this is what I actually bought for my master,

keeps the same concept but maybe isn't the exact items...

Also, I make a list of all the items on my mood board so that when I am out shopping I know exactly what I should be looking for. This is key so you don't impulse buy.

Next, I try paint samples. [if I'm painting the room] It is so important to try your samples on the walls. I cannot stress that enough. Don't go buy a gallon of paint just because it looks great in the store on the paint chip, you need to get a sample [Valspar samples are just $3.98 each] and paint a swatch on every wall to see it in the different lights. I usually paint mine then wait a week or so to see how I really feel about the color. Once I've decided I paint the room immediately.


After that, its the easy part: decorating.

After that, you're done!


Wednesday, June 29, 2016

Man cave progress

We started work in the man cave and I am really loving the progress. We did make some changes to the original plan which, If you remember, looked like this:


But after much thought we decided that it wasn't really necessary to purchase another sofa for this room when we have a perfectly good love seat down stairs that we would be otherwise giving away [the sofa is falling apart, read more about it here] so we switched it up and came up with this design instead...

The first thing we did was to paint. I knew I wanted a dark accent wall or two and we decided on Valspar's Crucible in an eggshell finish. Its a pretty grey blue and goes well with our style. We finished the other walls in the same color as the downstairs: Valspar Frappe.


Then, I had Zack build me a rustic desk in the odd little nook of the room so that I could get my crappy Target desk out of our room.


Its a lot more spacious than my other desk and much more my style, so now Ill have a place to design without being cramped.


 I'm really happy with the room so far and pretty much all we have to do now is add furniture and accessories. Till next time!

xoxo,
Jackie

Black Doors

I have been eyeing all these amazing bloggers with black doors and I really really wanted to do it myself but I wasn't sure what my landlord would think. I mean, black doors are a huge commitment, once its done its not going back. Finally, one day I just texted him saying "How would you feel if all the doors in your house were black?" and I attached a couple pics of my inspiration...

My favorite blogger, Jenna Sue Design has black doors all over her house, click here for more pics

or this one.... lovee
To my surprise, he wrote back, "Looks interesting, go for it!" I was shocked but didn't want to ask questions so I went to Walmart and picked up a can of Glidden High Endurance grab-n-go paint in Onyx Black [satin/eggshell finish], a paint brush and a trim roller. As soon as I got home I started on the first door...


I'm not going to give a full tutorial because there's a ton on Pinterest you can follow but all I did was removed the knobs and left the door attached, brushed on two coats in the border areas, then rolled two coats over the whole door. I didn't seal them or anything and so far they are holding up great. Here's the kitchen doors....


 And the entryway doors ...


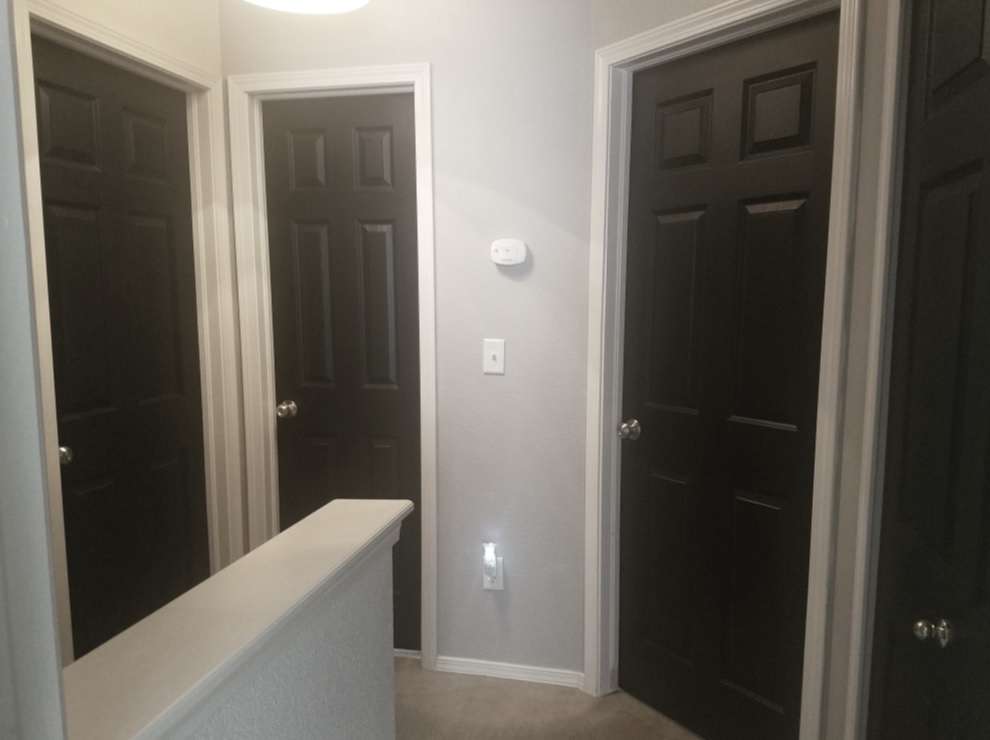
The upstairs doors....


And a little before and after.


What a difference its made! I am in love with them and I know you might think they darken a space but honestly I don't feel like they do. They look so rich and custom. Definitely another step to making this house our home. Next on my list is replacing all those gold knobs! Yuck! Who ever thought gold was a good idea? Till next time!

xoxo, 
Jackie