Sunday, December 31, 2017

Living Room Layout

Last week I talked about Room Styler and how I had messed around with the idea of a new layout for the living room. I decided it was time to try it out and I gotta say, I feel dumb for not changing it up sooner! The basis for the new layout was to create a better focal point by making the sofas face eachother and letting the fireplace stand out. We also wanted to create more open space for the dogs to play and create a better visual from the kitchen. Heres how it looked before Christmas.

from the kitchen
from the garage 
to the left of the fireplace 

And now that all the Christmas stuff is packed away and the new layout is in place...


Love it or hate it? Let me know!

---Jackie

Tuesday, December 19, 2017

Visualizing A Space In 3D

Often times, you can find me sitting at my computer constantly just creating imaginary rooms. I love being able to see everything together. Normally, I just use paint shop on my computer and copy and paste the photos there to create a mood board like this one for my friend, Abby.

Sometimes though, that's just not enough to give you the full effect of the room. I found Room Styler  a while back by Googling "3D room planner." It was one of the first pages to pop up so I checked it out. I am in LOVE y'all! You can create the room to your exact measurements, add shiplap to the walls, paint, furnish and decorate it all in one spot. Its easy to  use and shows you a real time 3D rendering on the right side of the page that you can blow up and save to your computer, or, if you create an account, you can save it and work on it later! You can also move the camera around to get different angles of the room which is so cool! Here's a quick how to.....

Once you create your room shape you can pick your paint colors and floor color, then add your windows and doors


You can adjust the size of the windows and the height from the floor too!

Now add your furniture


And finish off with your decor.


Click the expand button to see your finished space.


Heres what I ended up with.


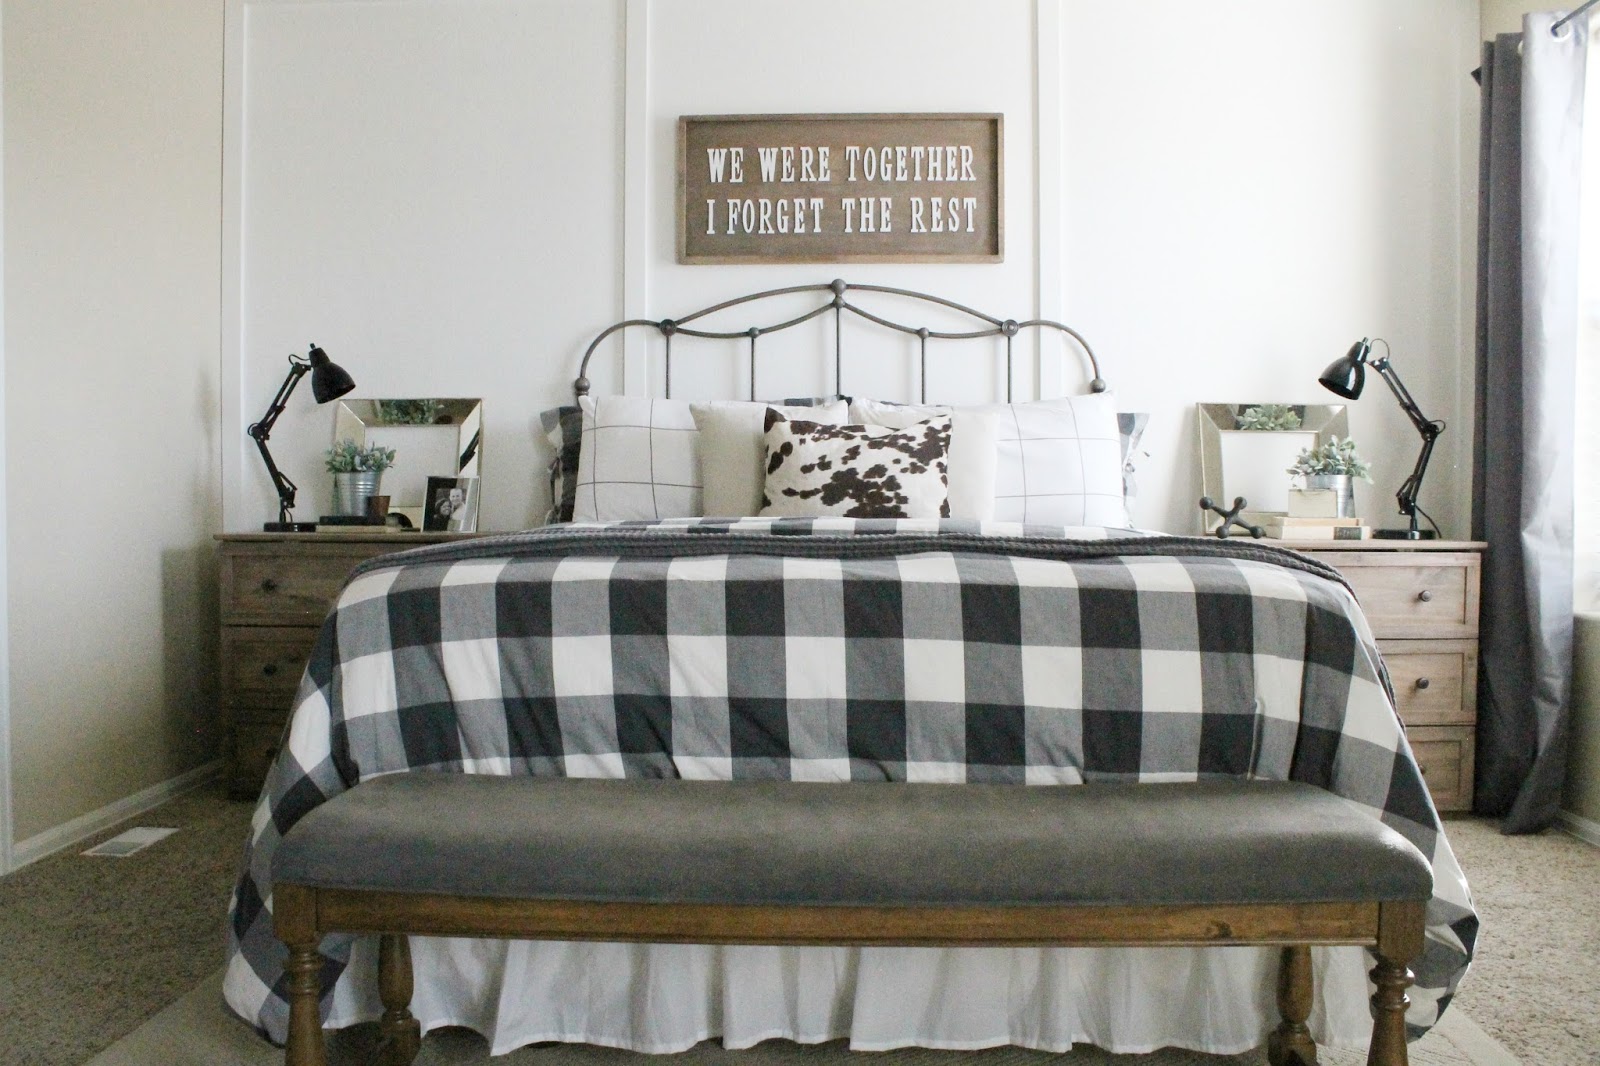
The really awesome thing is that they have literally every piece of furniture you could imagine, so you can really get the space to look as close to the real one as possible. Here's a rendering I did of my Abbys house.


Here's the actual space....


Pretty darn close right? I have been using it to manipulate my living room to see if I can come up with a different layout and now I think I'm going to take the plunge because of it! Any spaces you've created using Room Styler, I'd love to see them!

---Jackie

*this is NOT a sponsored post, all opinions expressed here in are my own.

Wednesday, December 13, 2017

Master Bedroom: Accent Wall

I have been in love with the board and batten accent walls for a while now. You see them all over Pinterest and I always said that one day, when I had my own house, I would put one in. Today is the day!
source
I first started my project by painting the wall white, I chose Valspar Swiss Coffee because its a creamy white and isn't too stark against the beige walls and ceiling.


I painted two coats to get maximum coverage, but I didn't paint all the way to the edges or to the ceiling as these parts will be covered by boards.


Next, I measured the boards and cut 4 of them to fit vertical, two on each end as a border and two in the center to create the board and batten look, then, we nailed them into the studs.


After that, we measured in between the vertical pieces, cut to fit and nailed them in horizontally across the top.


Now, I calked, filled, sanded and painted all the nail holes and imperfections and added crown moulding to the top and quarter round to the sides to really complete the look and make it appear custom.

I am so in love!


Before:

After:


---Jackie

Sunday, December 10, 2017

Wireless LED Lighting

I'm not sure why our kitchen gets so little light, maybe because of the way the house faces or maybe because some really smart builder decided that one single little boob light over the island would suffice, either way, we're fed up! The other night I was cooking and realized it was incredibly dark and I couldn't see what I was doing, then I realized the light under the microwave was burnt out! Seriously without that light you cant see ANYTHING on the stove top at night. At this point Zack is telling me we need to look into under cabinet lighting, we plan to add an actual wired in light above the sink eventually but we need something else in the meantime. I knew I didn't want any cords hanging out so it would have to be wireless. We searched online and found great reviews on a set from Amazon [linked here in case you'd prefer them] but then we were walking around Gordmans and found this set [link for Amazon if you want this set] with a switch for $19.99 ...


Its pretty easy to install, you just pop the back off and throw in some AAA batteries [buy a big pack, this set calls for 15 AAAs]  and twist it back on.


then you'll put the sticky pieces on...


Hang the switch somewhere within the range, I put ours next to the other switch for the island lights.


Now, turn the lights on before you hang them so you can see where they will shine before they get stuck down.


Then just stick it under the cabinet and enjoy!


These aren't as bright as we were hoping but they do provide more light for us which really was the goal and for only $20 I think it was a steal! Heres a lights off/lights on comparison.
off, during the day, no other lights on 

on, with no other lights on during the day.

and at night....
at night, all lights off

at night, only LED on 

at night, LED lights and microwave light on 


--Jackie

Monday, December 4, 2017

DIY $20 and 10 Min Blanket Ladder

The title says all you need to know. $20 and 10 minutes of your time is all you need to make a stylish and functional blanket ladder. I don't know about your area but in Colorado these ladders are sold EVERYWHERE and people up price them so much! This one woman quoted my grandma over $65 for a six foot ladder. Crazy! Why pay someone to do something for you that you can do for yourself?

All you need [depending on the size you want] are two pieces of wood the same length [I chose 1x3x6 in pine] and one smaller sized piece for the rungs [I chose a 1x2x6 in pine].


Cut your smaller piece into sections keeping in mind that this is going to be the width of your entire ladder so don't go and choose 10" pieces because after you nail it down you're gonna have this super stick skinny ladder [unless that's what you're looking for, no judgement!] I made my rungs 21" and chose to do three rungs. If you want to do more you'll need another piece of wood the same size.


Also, I want to point out that I went with more expensive lumber for this project so you CAN do it for cheaper than $20 however, I chose the pieces that I did because they are perfectly straight and perfectly smooth. If you don't care about knots or curves in your wood, by all means choose the cheaper kind! My total came in at $19 and some change at Home Depot. 

Now that you have cut your rungs, lay the long pieces of your ladder down on a hard surface and place your rungs [however far apart you want, placed mine 12" apart] on top making sure that the rungs are completely flush with the side of the ladder.


Nail those puppies into place! [if you don't have a nail gun you can use small screws or a hammer and nails!]


Not too shabby right?

You can also flip it around so that you don't see the nail holes, either way, it looks awesome!


Then stain or paint however you see fit


And place it somewhere in your home that it can be admired!


---Jackie