Wednesday, May 26, 2021

DIY Double Barn Doors

 Wow, its been a while since I've shared a project, but that doesn't mean we haven't been busy! This project was one I knew we'd end up doing sooner rather than later because there was absolutely no privacy to our master bath. The problem with this opening, and the reason we built the doors from scratch, is its extremely tall. There aren't any standard doors we could find to fit and the cost of custom doors, plus needing two was outrageous, so we were left to DIY it. Here's the before:


And my terrible drawing of the plan:

To build the doors we purchased 3/4 in MDF from Lowes, thin square moulding from Lowes, this double barn door kit from Amazon, a set of 10 inch pulls from Amazon and these cup pulls from Amazon. All we did was cut the plywood in half (we had Lowes do this!), then we cut them to height with a circular saw. After the panels were cut we measured and cut the lathe pieces to fit (here's where you can really customize the doors!) and glued them down with E3000 using clamps to hold until the glue dried. Next, I caulked all the seams and painted, attached the handles and Zack attached the barn door hardware and we attached the track directly to the wall into the studs before placing the doors on the track.

They aren't perfect by any means, there is a small gap when closed as the MDF did warp in the garage due to the weather changed (don't do what we did and leave them out there, keep them inside if possible!), but we love them and they give us the privacy we wanted. 

Lots more DIYs coming up soon!

---Jacqui


Thursday, January 7, 2021

My Friends House

 My really good friend, who also happens to be my neighbor now, has a totally different style than my own. If I were to describe her style its colorful modern/boho/southwestern. She's from Arizona and loves that desert look but she's also really into color with some boho texture and pattern thrown in. She asked for some advice and I invited myself to help her get it all together.  Here's some before and afters of a few spaces we've been working on 


I'm so in love with how its all turned out and I know she is too. Her and her husband have alot  ore projects planned and I will definitely update this post as they make progress. 


---Jackie 

Wednesday, January 6, 2021

Guest Room Makeover: Reveal

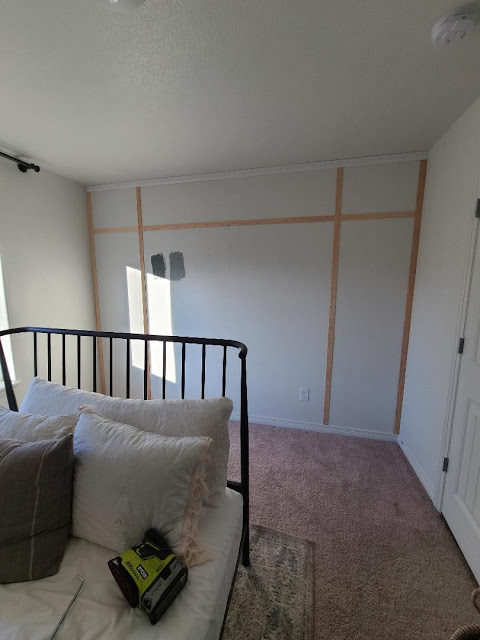
Last week, after finishing the office, I started on the guest room. I loved the accent wall in the old house guest room but I wanted this home to be lighter and brighter and I wanted to try something new. Here's how it looked before the makeover.

I gathered inspiration from Pinterest and Instagram before creating a mood board for the space. 


The first thing I did was the accent wall. I started with baseboard molding as the "crown", then added the vertical pieces with thin trim from Lowes.  Then, I cut the horizontal pieces to connect to the vertical ones. The final step was to patch holes, caulk and then...paint!


I picked out two paint samples that I thought were going to be awesome but they turned out to be terrible. One was way too dark and the other came out way too gray. I went back with my husband, described the perfect paint color and asked him to look for it, and lo and behold, he found the one (SW Woody Rosemary)!


Went I got the two swatches on the wall he (and our friends) loved the one on the left (SW Windswept Cliff) but it was beige, and I was set on the green, so I went for it! 

I did decide to paint the closet doors with the beige and I just love the neutral doors combined with the green wall. 

With the accent wall and closet doors all finished I was able to start on the decorating. I sold the old nightstands and found this really cool end table at Homegoods along with a LaJolla basket I'd been hoping to find for forever now. I added this gorgeous chandelier from Amazon and two wood frames from Target with art from North Prints to finish it off. 


Here's the final result.


I have to many projects on my list for this year, I'm not sure where to start though so stay tuned.

---Jackie 


Wednesday, December 30, 2020

Office Makeover Reveal

 I knew from day 1 that I wanted another built in desk. Originally when we were planning for the layout we thought the front room (the now guest room) would make the best office, it has mountain views, is right in the front of the house etc. After we lived her a week or so I realized that wasn't going to work. Too many people walk by our house (its a corner lot right by a school/park) and I felt too exposed. Besides, it was too large for me to take up as an office. Late one night I switched the furniture and started to plan for my office space. Here's how the room looked when we got the keys...

And after the swicheroo of the rooms.... 

And here's my mood board for the space...

We started with plain old unfinished base cabinet from Lowes. Zack cut the base off of them (they'd be too tall otherwise), I painted them Sherwin Williams Tricorn Black and then we attached a pre-cut 8ft piece of unfinished butcher block from Lowes. Then, I added hardware from Hobby Lobby  and an unfinished piece of pine from Lowes with some awesome metal brackets for a modern floating shelf.

Now came the fun part: Decorating! I wanted a large cork board to pin all my inspiration pictures, paint and textile samples, floor plans etc. I found this tutorial on Pinterest and bought the foam board from Lowes in a 4x8 FT piece for only $6 we also bought gold screws and washers from Lowes and some linen fabric from Hobby Lobby where I used their 40% off coupon. To put it all together I cut the foam to size using an exacto knife. Next, we laid the fabric on the floor and place the foam on top and wrapped the fabric around the back and TAPED it onto the foam board using packing tape. Worked like a charm! Then, Zack screwed it into the wall while I held it straight. After that I started pinning all my favorite things! 

I kept my leather chair that was already in here, added a side table, stole a mirror from the guest room and some decor from my stash, bought some beautiful curtains from Kohls and (after a few swicheroos) landed on this rug from Overstock. 


Im so happy with how it turned out and though its very simple, its very ME! I am now brainstorming ideas for a nice guest room refresh so keep an eye out for that post coming soon.


---Jackie 

Tuesday, December 8, 2020

Master Bathroom : Making it our own

 I am not a fan of the builder grade mirrors, like at ALL. I ripped them out of our old house an even asked if they could be left out in the new house (they couldn't :( ) so I knew I'd eventually rip them out of this house too. 


The problem was that I couldn't find any mirrors I loved more than the ones in the old house. I even tried to fin those again but they were sold out. One night I went to Target with a friend and they had 2! I snatched them up and then set out to find some lighting. I wanted this house to feel more modern than farmhouse so I found these awesome linear lights from Amazon for $30. Now that I had all my supplies I ripped that horrible mirror off the wall the next morning and hung the new mirrors.


A few days later I , patched, textured and painted the wall and hung the new lights. 


I love the transformation and I feel like this house is started to take shape and feel more like US. 

Before

After

Now we are working on my office and I can't wait to show you how great it looks! 


---Jackie 

Friday, October 2, 2020

Progress Has Been Made!

 When we sold our old house the buyers wanted our bedroom furniture, which I was stoked about because I wanted to try a different style in this house anyway. Fast forward to move in day and I STILL hadn't found a bed I liked. I had the dresser and the nightstands but couldn't find exactly what I wanted (in my budget!). I even ordered two separate beds and then cancelled the orders because I changed my mind. So for the past month our room looked like this....


Mattress on the floor looking like a newlywed apartment. I ended up finding this bed on Target.com and while I liked it, I didn't love it, but I was so tired of sleeping on a mattress on the floor that I said screw it and ordered it. 


I even created this mood board and started to really fall for the idea

It was supposed to arrive on Sept 23-the day after we got back from vacation-and I followed the tracking up until the 21st when it stopped moving. I knew with COVID things were taking longer but after a WEEK with no movement I contacted Target. They said it was lost and all they could do was refund or replace and a replacement wouldn't arrive 'til October 8 (if it didn't get lost too!). Initially I decided to replace but after thinking it over I cancelled it and bought a cheap platform frame from Amazon until I could really figure out what I wanted. 

A couple days later I get an alert that a package arrived on my doorstep and lo and behold-it was the Target bed! I thought about returning it (due to my other order having been placed and wanting to find something I LOVED) but when I opened it to take a peek I fell so hard. The color was prettier in person and I just had to have it. My friend helped me put it together and once I saw it all in the space I knew it was the right one. 

Here's how our room looks today...


Down the road we want to change the light fixture and possibly add some picture frame molding (New Orleans style!) to the large wall on the left, but for now we are so happy to be off the floor and in a more sophisticated room.


---Jackie 


Sunday, August 30, 2020

Current Home


Welcome to our DREAM home !

EXTERIOR BEFORE:


EXTERIOR AFTER:


ENTRYWAY BEFORE:


 ENTRYWAY AFTER: 


KITCHEN BEFORE:


KITCHEN AFTER:


LAUNDRY BEFORE:


LAUNDRY AFTER:


DINING ROOM BEFORE:


DINING ROOM AFTER:


LIVING SPACE BEFORE:


LIVING SPACE AFTER:


MASTER BEDROOM BEFORE: 


MASTER BEDROOM AFTER:


MASTER BATH BEFORE:


MASTER BATH AFTER: 


MY ROOM BEFORE:


MY ROOM AFTER:


GUEST BATH BEFORE:


GUEST BATH AFTER:


OFFICE BEFORE:


OFFICE AFTER:


BACKYARD BEFORE:

BACKYARD IN PROGRESS:


Video Walk Through Before 


Current