Friday, August 25, 2017

Fireplace Makeover

Zack and I built a faux fireplace back when we lived in our apartment, so, quite a while ago. We've lived with it but ultimately knew we needed to rebuild it. Now that its the focal point in our living room it sorta sticks out like a sore thumb. We built it pretty half assed to be  honest. We didn't have the right tools and I was rushing to get it done just to have something in the space that I didn't focus enough on the details of it, but now that I've lived with it, and stared at it for a couple years now I have really tried to pin point the style I want. Here's a couple of my inspiration pictures...

source

source
The first thing we decided to do, and don't ask why we started with this part first because I don't know, was planking the wall. I chose to do it for several reasons, one, because it makes the fireplace appear built in and real, two, it makes it appear larger and more grand and three, because its a popular trend that I have fallen in love with. Of course, we did it the cheap and easy way.

We started with a trip to Lowes [isn't that how every project starts] and picked up a sheet of thin, cheap [$14.98] plywood. We had the people cut it into 6" strips right there to save time. We also picked up pieces of 1x4 primed MDF. When we got home I sanded the edges of the planks so that there were no sharp edges.


We marked the studs and then got to work. The first step was to make sure the top plank was level, most ceilings are not perfectly level so you want the plank to be leveled and not just pushed against the ceiling, otherwise, as you continue your planks down the wall it will become very noticeably uneven. Once the first plank went into the wall we used nickles as spacers and continued nailing the planks down the wall using a level every 3rd or so plank to keep it all straight.


Once all the planks were up [we only planked down to the top of the fireplace], we measured and cut the MDF and then nailed it into the studs as well. Then i got to patching and caulking. I use spackle on all the nail holes and then ran a bead of caulk where the planks met the MDF.


After the spackle and caulk dried I sanded it all down with a 220 grit sanding block and then wiped it down with a wet rag to clear off any dust. Then, I primed it with two coats of my favorite primer, Zinsser and one coat of leftover trim paint from the builder. [it's not a permanent color, we will change it when the entire fireplace is rebuilt]


Better already.


We put everything back together and decided we will finish the actual fireplace surround, and choose an overall paint color [I'm thinking grey], when we get back from vacation in a few weeks. We will be using this plan from Ana White and adding a few modifications to fit it to our space. Hope it turns out okay!

---Jackie

Thursday, August 17, 2017

Half Bath Mini Makeover

I have said it before and I'll say it again, there is absolutely nothing wrong with this house. I keep making over spaces not because they aren't good but because they aren't me. Such is the case with our half bath.

It's okay... if you like builder grade mirrors and floors and counters and cabinets. I do not. I want to eventually paint all the cabinets in this house, maybe, someday, but I have heard horror stories about people painting their cabinets only to have them chip and peel in a matter of weeks! I was afraid. After talking to my very best friend, Abby, about her vision to paint her cabinets green [yes, I will absolutely show it off on here if she does it!] I realized I just needed to do it the right way. So all you people out there that love no prep, no sanding, easy peasy stuff, this is not for you. I wanted to make sure this stuff adhered the best way possible and chalk paint just was not that. Sorry guys. I can't jump on that train.

My research found that 1. you have to prep correctly with cleaning, sanding and priming and 2. you should always use an enamel paint because it dries rock solid and won't scratch. There were a lot of recommendations for Behr Premium Plus Ultra paint and primer interior satin enamel [what a mouthful]. Only issue was that I LOVE Valspar Ocean Storm, which is only sold at Lowes, so I took in a swatch and the awesome [bearded] man mixed it up for me. Seriously, his beard was glorious, and the paint turned out a perfect match.


Moving on, to prep the cabinets I removed the doors and drawers, cleaned everything with a TSP mixture and then sanded everything with my Mouse sander and 120 grit paper until the sheen was removed.

Next, I painted two coats of Zinsser primer [from Walmart] this stuff was also highly recommended because it will stick to anything!


Then, I rolled on two coats of the paint with a foam roller [using a brush to get into the corners].


After that I added some cup pulls and knobs [in black] from Lowes and put it all back together.
this is a very accurate depiction of the color "Ocean Storm"

Once the cabinet was looking all modern and amazing, the mirror stood out like a sore thumb. I found this tutorial online about how to make a cheap and non permanent frame for a builder grade mirror, seemed easy enough so I got to work. I picked up 3 pieces of 1x4 and cut them to fit mitering the corners to 45 degrees. Then, I stained all the pieces [same way I stain everything in my house, click here for the tutorial] and screwed them together with L brackets that I spray painted black. [I left the screw heads silver because I like the mix of the metals.]


Once the frame was assembled I added command strips [that hold up to 16 lbs] to the back of the frame. I peeled off the backing and carefully placed the frame on the mirror where I wanted it before pressing firmly to attach the command strip to the mirror.


Now here she is ....


So far its all holding up well and not a single scratch on the cabinets. Even Zack was impressed. Someday, I will update those floors, counters, light, sink and faucet but its a great mini makeover for now!


Any mini makeovers you've done lately that made a world of difference?

---Jackie

Wednesday, August 16, 2017

Entryway Makeover

Since we first walked into this house to tour it I had envisioned a cute little entryway with hooks for coats and handbags, it took us a while to get around to it but we finally did! At first I wasn't sure if I wanted a more board and batten look, like this


or a bead board style like this.


Eventually I decided on bead board because I wasn't sure our textured walls would look right behind the board and batten style. Off we went to Lowes and picked up our supplies: One piece of bead board plywood [in the decorative plywood section] and we had it cut in half. Then we grabbed an 8 foot piece of a primed MDF board, some hooks, two pieces [4 ft] of quarter round and caulk. Then, we went to Home Depot because I had researched other tutorials that said the Behr satin enamel paint [and primer in one]  was the best for areas that get a lot of use and I had them color match to Valspar's Ocean Storm. I also used painters tape, Zinsser primer [from Walmart], a sanding block, paint roller and brush, nail gun, level, pencil and Spackle.


The first step was to hang the bead board. We started by hanging the side that didn't need any cuts, the left side. first, we marked the studs on the wall with pencil then used our nail gun to nail it in.


Next, we [and I mean Zack] cut out the outlet by measuring where the center of it fell, drawing it onto the bead board, then drilling 4 holes [one in each corner] and using the jigsaw to cut it out.


We then nailed up the second piece and screwed the outlet back into place.


Then, we measured the wall and cut the MDF to fit, leveled it and nailed it into the studs.


Almost done!


After that, I went ahead and spackled the holes and caulked the large "crack" where the two pieces of bead board met and where the MDF met the bead board.


The next day, after everything had dried, I sanded it all smooth with my sanding block [220 grit] and wiped it down with a wet cloth then taped everything off for paint.


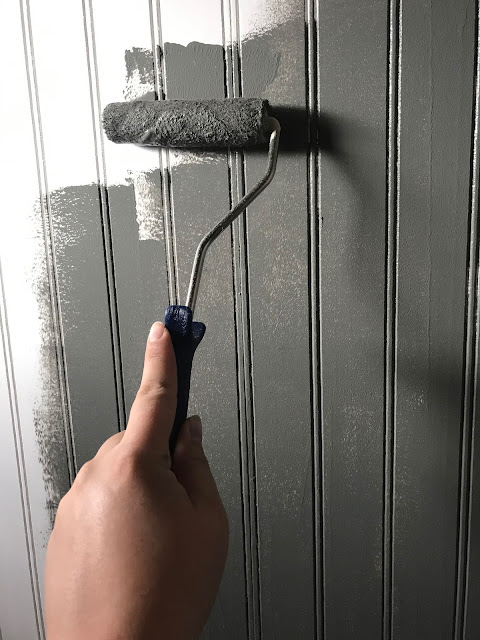
After that it was time to paint. I first cut in using my brush and I used 2 rollers for the larger areas: a nap roller and a foam roller. I did the first coat with the nap roller to really get into the crevasses of the bead board that the foam roller just couldn't reach.


After the first coat dried I rolled the second coat with the foam roller then went back over any crevasses that got missed with a brush. Then I removed the tape and let it dry.


The final step was to add the quarter round, [which I had painted separately and let dry] I just used hot glue to attach it to the wall. And after screwing the hooks into the studs and adding some amazing art [click here to shop] it was all done!


What a transformation huh?


---Jackie